How to Sync Audio in DaVinci Resolve


Recording with several microphones and cameras? In the past, we all used to struggle manually dragging and matching the audio files, frame by frame, till we would get it right. Of course, this method works, but takes a lot of your precious time. Meanwhile, DaVinci Resolve does a pretty good job syncing audio clips automatically — so let’s get cracking!
1. Go to “Media Pool” under the “Edit” page and import your audio and video clips that need to be synced.
2. Select all your video and audio in the media pool that you want to sync and right-click them.
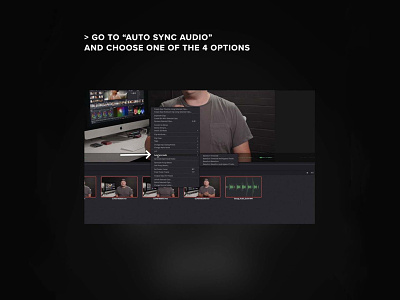
3. Go to “Auto Sync Audio” and choose one of the 4 options: Based on Timecode, Based on Timecode and Append Tracks, Based on Waveform, Based on Waveform and Append Tracks.
The two main options of synchronization are:
- Based on the Timecode — used a lot with professional broadcast cameras that can ingest the reference timecode signal.
- Based on Waveform — for various types of cameras like DSLR or smartphones. All the cameras recording the audio should be able to match with the audio reference.
For each option you have two choices — with or without Append Tracks. It means that DaVinci Resolve will not replace the original audio but will append the new audio track to the original one.
After you click the option, the synced video will appear in the media.
There you have it! Get to know more about manual synchronization and other tips and tricks on editing workflows in DaVinci Resolve with MotionVFX Academy 👉 https://bit.ly/3kszPm7


